![]()
If the clock is to stand on a fitted carpet, sometimes the carpet thickness against the wall is greater due to a hem or grip rods. It may be necessary to compensate for this by using a piece of matching carpet or wood and placing it under the front feet so that the case stands flat and solid against the wall.
If you wish to screw the case to the wall (highly recommended for several reasons) this can now be done. Do check that the case is standing completely upright and not leaning backwards before doing this, as this could cause the pendulum to rub on the back of the case, subsequently stopping the clock. Check also that the visual uprightness of the clock is correct from all parts of the room. There is nothing more annoying than a clock which appears to lean to the right or left when you look at it. In order to get full enjoyment and reliable running from your clock it is well worth paying close attention to this step right at the outset.
The majority of longcase clocks already have one or more holes in the back of the case. Feel free to drill one if there isn’t already. It will do no harm. Now, with the clock in the correct position against the wall, put a pencil through this hole and make a mark on the wall. Move away the clock case and drill and rawlplug the hole ready to accept a screw. Drill a hole in the piece of wood that is to go between the clock case. This hole can be slightly bigger than the screw you will use. Now move the clock case back into position. Feed the screw through the hole in the back of the case and also the piece of wood you are using and then line up the screw with the hole you have prepared in the wall. Ensuring that you use a long enough screw to go through everything and also get a good grip, you may then tighten the screw until the clock is held firmly and securely against the wall.
Although longcase clocks can be free standing (and often are) a multitude of problems can be avoided by following the step above, and securing the clock case to the wall.
Before doing this, always check that the gut (or sometimes wire) lines are still on the winding barrels and have not unravelled and wound themselves around the winding arbor. If they have, undo them and put them back onto the barrels. It may be necessary to undo the guts from the seat board and take the pulley wheels off, to unwind the gut off the spindles. If this is the case, always remember to replace the pulley wheels before fastening the gut back onto the seatboard.
Place the movement into the case and position centrally. Most movements will sit reasonably squarely in the case. As a general rule the movement should be just forward enough from the back of the case, to allow the crutch, through which the pendulum swings, to be free from the backboard.
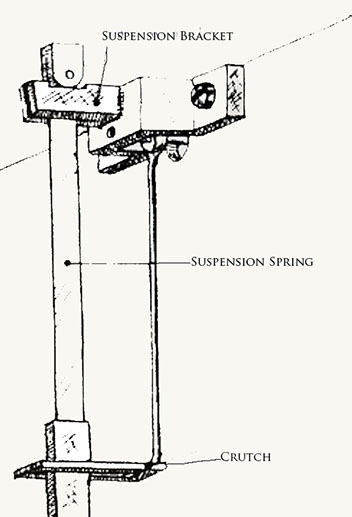
Most pendulums have a front face and back face. The smooth polished part of the pendulum bob, should be at the front.
Feed the pendulum through the door in the clock trunk up through the hole in the back of the seatboard, threading the feather or suspension spring through the eye of the pendulum crutch and hanging it between the cheeks of the suspension bracket at the back of the clock movement.
The pendulum should be hanging free from the backboard of the clock case. If it is rubbing against the back, the case may still be leaning backwards and a thicker piece of wood will have to be fastened to the back of the case. It may be possible to move the whole of the seatboard forward, but only if this allows the hood to fit on properly
Again, it is most important, before hanging on either weight, that you check that both gut lines are on the winding barrels. If they have come off, then remove the pendulum, and put them back on. You may find that one weight is heavier than the other. To start with, the heaviest weight should be put on the going train side. This is the right hand side as you face the clock. This applies particularly to clocks which have a rolling moon or automatum mechanism. If, when you get the clock going, you find that the strike is sluggish, you may change the weights over, as long as the lighter weight will still drive the going train and pendulum. The strike train is the one on the left as you face the clock.
The two weights should now be hanging free from the pendulum at the back and free from catching on the closed door at the front. If they are not, then adjustment must be made to the case so that the weights, pendulum, and door do not come into contact with each other during the eight day fall of the weights.
You can now wind the clock, but never wind the weights right to the top. Always leave a couple of inches before the top of the case. If you wind the weights right to the top and then find that you have to remove them, although this may be possible, it will be extremely difficult to put them on again from this position.
The clock is now ready to go so you can gently swing the pendulum until it starts to tick. At this point you should be listening for a steady “tick-tock-tick-tock”, which is even on both sides.
If you hear this even sound, the clock is in beat and should keep going.
If the beat is irregular e.g. tick-tock——tick-tock, then the clock is out of beat an adjustment must be made or the clock will stop. This can be done by carefully bending the pendulum crutch (the thin wire rod that the suspension spring on top of the pendulum, threads through).
By standing in front of the clock and placing your arms either side of the dial, with one thumb at the top of the crutch and one thumb at the bottom, the crutch can be bent in the direction of the bottom thumb.

It should only require a very small bend to put the clock into beat. By bending either a little to the right or a little to the left (you will need to alter the position of your thumbs) a nice steady tick-tock-tick-tock should be achieved and the clock is then in good running order and should run in a trouble free manner.
Before putting the hood on, you may have to set the moon phase and/or the date. In the case of the moon,his can be done by rotating the disc with your finger until the correct position is obtained. The correct phase of the moon for any date can be obtained by going to www.moongiant.com/calendar/. The moon disk on most clocks should rotate freely and make a clicking sound as it goes around when pushed by hand. If for some reason it will not move freely, this indicates that it is in engagement with the change mechanism in the movement of the clock. In this case the clock should be advanced by about three hours before making the change. The clock can then be set to the correct time, always remembering of course never to turn the hands backwards, and ALWAYS to allow the clock to strike the full hours at twelve O’clock. Failure to do this can cause damage to the striking mechanism which you will not be able to correct without consulting a clock restorer. Similarly the date disk (or sometimes a hand) can be advanced to the correct date. If it does not move freely, the same situation applies as with the moon dial. The mechanism which allows the clock to change the date is engaged, and the time should be advanced by two or three hours to allow you to make the change manually to the correct date. Something that you will also have to do when there are less than 31 days in the month.
Normally you will find that both the moon disk and the date disk are engaged (and not able to be moved manually) whenever the clock hands are between 11 and 1. Some longcase clocks move both disks twice in a 24 hour period and some only once. You should be able to ascertain by observation which applies to your clock, so that you will know when it is safe to move the moon and the date manually.
Sometimes the bell hammer may need adjusting to obtain the best sound. This can be done on some clocks by very slightly bending the hammer rod, but such an attempt should always be approached very carefully and with great caution so as not to cause damage. It is also advisable to check the the nut securing the top of the bell is tight and that the bell itself is not free to move.
If for some reason you do not want the clock to strike at all (close proximity of neighbours or whatever) it is best to consult a clock restorer, who will make a fully reversible adjustment to the lifting piece inside the clock movement. This should never be done simply by not winding the striking side of the movement as this can cause some damage to parts of the mechanism. Although the striking train is not wound, the clock will still attempt to release the strike mechanism unless the lifting piece has been adjusted so that it can not.
When the need arises to adjust the time on a longcase clock, it is essential NEVER to move the hands backwards. Although it is possible on some clocks which have been designed to permit this, if your clock does not incorporate this design feature, turning the hands backwards will result in expensive damage to the striking mechanism.
When turning the hands forwards, if your clock has a striking mechanism known as “rack striking”, then it is permissible to turn the hands forwards to the correc time without stopping, but with the exception of the twelve o’clock position. At 12 o’clock you MUST always stop and allow the clock to strike the full 12 hours. Failure to do this can again result in some expensive damage to the striking mechanism.
If your clock is built with what is known as “count wheel” striking, then it is necessary (even though it may be slightly tedious) to allow the clock to strike the hour at EVERY hour. Failure to do this will result in the number of hours being struck on the bell being out of sequence with the time shown on the dial.
When winding the weights, always leave the weight on the going train, right hand side as you stand in front of the clock, half an inch lower than the striking train or left side. In this way, the clock will always stop running before the strike runs out and the strike will always remain in the correct sequence. This particularly applies to clocks with the “count wheel” system of striking.
If your clock is gaining or losing time, an adjustment will have to be made to the height of the pendulum bob which is the large disk which swings at the bottom of the pendulum. Below the bob is a small nut which can be turned either up or down, thus allowing the bob to move either way. To make the clock go slower, the pendulum must be lengthened so the bob will need to be moved downwards and to make it go faster, it will need to be effectively shortened and the bob will have to be moved upwards.
When time goes forward one hour just move the minute hand forward, remembering to let the clock strike where necessary. When the time goes back one hour, stop the pendulum from swinging for one hour and then re-start it again.